Highest-quality

Products, resources, and support for oboists of all ages and levels of ability

More Thoughts on CANe Selection

Before cane processing can begin, careful and discriminatory cane selection must take place. There are a few areas in life where “discrimination” carries a less derogatory connotation. It’s okay to be prejudicial in terms of cane selection. In fact, it is important! The more you can discern between different pieces of cane, the more consistent your reeds will be.

How many oboists have exclaimed, “I love playing the oboe, but I hate making reeds!” Cane selection is one way to reduce the frustration of reed-making.

Good reeds don’t magically happen because you have sharp knives, a particular brand of staples, or the latest and greatest shaper tip. The foundation of a great reed is a good piece of cane.

There are a several reasons to practice cane discrimination:

  • Inconsistent reeds and possibly inconsistent performance (This should be reason enough!)
  • Frustration with the reed-making process
  • Self-confidence issues: Inconsistent reeds will make you call in to question your materials, your technique, or your potential as an oboist.
  • Time!!! Cane processing takes too much time to waste it on cane that won’t become a good reed. Why spend more time at the reed desk than you have to?

The most important reason is that cane discrimination will allow you more opportunities for success and will decrease your chances for failure.

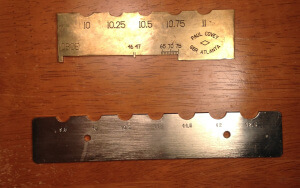
One of the most important tools necessary for cane selection is a radius gauge.

I have three radius gauges. I only use one of them to do any actual measuring. Another is the tool I’ve adopted to determine how flat a piece of cane is, and I don’t use the third at all. It’s just taking up space on my shelf.

The two shown in the picture below are the two that I use regularly. I like the Covey gauge because the curves are shallow and actually reflect the portion of the cane that I’m going to gouge. I also prefer the Covey gauge because it has increments of .25, and the one below only shows increments of .5.

I use the silver radius gauge as a flat edge to see where the cane bows or bends and that’s the only time I use it!

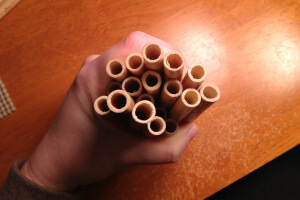
That’s enough radius gauge nerdiness for now! I’ve randomly selected a handful of tube cane from my bag. You can already see how different each tube is! Some are circular, some are shaped more like an oval, and there are a few with asymmetrical/pointed sides. More importantly, some of these tubes are much thicker than others, therefore, the cane is much more dense. When the veins are more compact, you are more likely to get better results. When the cane is gouged, the blade will remove cane from the inner curve. The thicker the piece of cane is, the more dense the cane will be as you approach the bark with the gouger.
The picture below shows two pieces of cane from the same bag, and there are distinct differences between the two. While neither piece is “wrong,” one of the two could be slightly more advantageous. Don’t judge the tube on the left by the gunk in the middle. The pregouger or the first few passes with the gouger will take care of the “extra” material, also known as the pulp. Notice, however, how much of a difference there is between the thickness of the two tubes. If you are good with your knives, you could probably make a decent reed from either piece of cane, but the thicker tube might give you a warmer and more focused sound because of the difference in how the veins are packed and organized.
If you want to track different pieces of cane based on their thickness, try marking the edge with a colored marker or Sharpie after you split and guillotine the cane. Mark the thicker pieces with the same color so you can objectively see whether or not there is a difference in how the reed vibrates. That’s what it ‘s all about anyway: Organizing and focusing the vibrations!

I mentioned earlier that the gouger removes cane from the inside out. Processing cane (splitting, guillotining, pre-gouging, gouging, etc.) does not change the outer curve, or the curve of the bark, so it is imperative to consider the the shape of the outer curve during the selection process. The outer curve determines how the cane will fit in the bed of the gouger. An ill-fitting piece of cane is going to leave you at the mercy of some very interesting reeds.

There are two issues to consider here:
The size of the curve of a piece of cane relative to the to the size of the bed of the gouger.
The shape of the curve of a piece of cane relative to the shape of the bed of the gouger.

A piece of cane can’t be judged based on one criteria or the other. It has to pass both tests. A beautiful curve that is too large for the bed of the gouger is going to result in a piece of cane that is too thin, and the resulting reed is predisposed to being unstable and vibrating too much. (Yes, there is such a thing as too much vibration!!!)

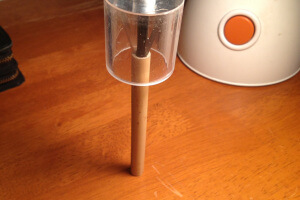
After identifying some potential pieces of cane with a radius gauge, the tube has to be measured and split into pieces so you can get to the optimal part of the cane. We will cover measuring and judging tubes in another installment of our cane sorting series. There’s no “correct” way to do this. Some people use a razor blade so they can be very specific in their selection, but I usually end up stabbing myself with sharp pieces of cane. Another option is shown below: a cane splitter!
A cane splitter is a fancy form of a hunting broad head on a dowel with some safety precautions, but don’t go steal the arrow out of your dad’s deer hunting equipment. That’s not sanitary, and he won’t thank you!

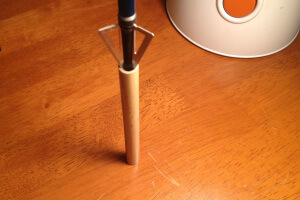
Oboists have put a plastic cap over the broad head to avoid injury. Insert the broad head so that the portion of the cane you want to gouge falls in between the blades.
We’ve discussed separating and storing cane in previous blog posts. This is the point where things get rough: not every piece of cane will work and not every tube will suit your needs. Most of the bag of cane will only be good for firewood. It will either be warped or end up being the wrong shape.

Check back for more thoughts on cane selection including what a good piece of cane looks like according to the radius gauge.

Julie C

 Cane Sorting, Part One: Inspecting And Splitting Your Tube Cane

Do you sort your cane? Well, you should! Learning to sort cane effectively will save you time, energy, and money.  This blog series will show you how to classify your cane assortment, separating out the pieces that are most likely to produce vibrant, quality reeds.

In my earlier reedmaking days, I rebelled against cane sorting, believing that I could “make every piece work”. Let’s face it: I was cheap. It astounded me to see people throwing away almost 50% (and sometimes much more!) of a batch of cane that they had just received. Had I paid more attention, I would have realized that these same people spent much less time struggling to make quality reeds than I did. While every reed you make isn’t going to turn out, it’s nice to know that the reason isn’t because the cane is warped, dead, or bug-infested J

The bottom line: time is money.  If you find yourself sitting at your reed desk for hours upon hours making reeds that don’t seem “quite” right (maybe they don’t seal, are a funny color or have extremely closed or open tip openings), then you could definitely benefit from being more selective with your cane.

This blog series will start at the very beginning, when cane is in tube form.

Things you will need:

-tube cane

-radius gauge (we like the one listed here, because it measures in increments of .25:

http://www.jeanneinc.com/mm5/merchant.mvc?Screen=PROD&Store_Code=JI&Product_Code=JT045&Category_Code=GM-ACC

-cane splitter or razorblades (we like this one): http://www.rdgwoodwinds.com/cane-splitter-oboe-oboe-damour-p-135.html

-several Ziploc freezer sized storage bags

1. Initial inspection of cane.

When you first get your cane, dump it all out on your workspace and examine the pieces: look at the coloring, length and general diameter of the tubes. You won’t typically be throwing anything out at this point, unless it is excessively black or green and no part of the tube can be salvaged (this has personally never happened to me). Some people begin to measure the tubes right away with their radius gauge, however I would caution against doing so at this point, as the radius of the cane can change once the cane is split.

2. Splitting your cane

Select a piece of cane and examine the outside. Does it have any markings? (some brown marks are ok and natural. Anything black or grey means the cane has died and should be cut off). Next, examine the ends: anything that is not in the shape of an “O” should be discarded (sometimes your will see “knots” in cane- this is where a shoot has started to grow off of the plant- these can be ok as long as they can be cut off after splitting).  If any of the “bad” cane parts are in the same area, position your  splitter so that you can cut them all off in one piece.

3. After splitting your cane, you need to determine which pieces are straight enough to keep. Get a VERY flat surface (I like to use the edge of my radius gauge) and place your split cane on it. If you can see any light underneath it, this means the cane is warped and should not be used. BE CAREFUL HERE: Many pieces of cane have ends that can be guillotined off in order to use a straight inner section of the cane. It is more obvious with some pieces than others. When in doubt, err on the side of being picky. It is not unusual to get rid of half of your cane in this stage.

4. Once you have guillotined your cane, you can measure it with the radius gauge. Take every piece and classify it by radius. If you want to be very specific, you can write the radius on each piece of cane—however, I find it easier to group them by range (common groupings are 10-10.5, 10.5-11, etc, although you could narrow them down to 10-10.25, 10.25-10.5, etc).

5. This is a good stopping place after all of your work! When you have sorted the cane by diameter, place it in plastic baggies and label them.